


Introduction
As product managers and business analysts, we’ve all been there: sitting in a stakeholder meeting, frantically typing notes, trying to capture the essence of customer needs while simultaneously wondering, “How do I turn these words into actionable requirements?”
After years of juggling sticky notes, Word documents, and disconnected modeling tools, I discovered Visual Paradigm’s Textual Analysis feature—and it fundamentally changed my requirements engineering workflow. This isn’t just another text editor; it’s a bridge between raw customer conversations and structured, visual models.

In this practitioner-focused guide, I’ll walk you through how I use Textual Analysis to transform unstructured problem statements into glossaries, candidate model elements, and ultimately, clean UML diagrams. Whether you’re new to Visual Paradigm or looking to deepen your requirements practice, this guide shares real-world techniques, lessons learned, and actionable steps—complete with the original screenshots to keep you oriented.
What Is Textual Analysis, Really?
Before diving into business process modeling, we typically spend significant time interviewing customers, understanding their operations, and documenting pain points. Textual Analysis serves as a specialized text-based editor designed to capture this qualitative information and help you extract structured insights from it.
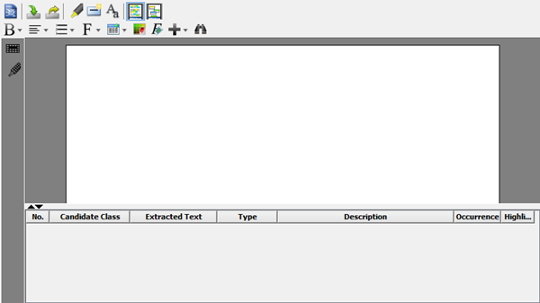
The Problem Statement Editor: Your central workspace for capturing and analyzing requirements text.
Unlike a plain text editor, Textual Analysis lets you:
-
Identify important terms and add them to a project glossary
-
Extract candidate model elements (classes, use cases, actors)
-
Visualize candidates directly in diagrams
-
Maintain traceability from raw text to final models
It’s requirements engineering with context—and that context is everything.
Getting Started: Creating Your First Textual Analysis
Here’s the workflow I use to kick off a new requirements session:
-
Select Diagram > New from the application toolbar
-
In the New Diagram window, select Textual Analysis
-
Click Next
-
Enter a meaningful diagram name and description (I always include the stakeholder name and date)
-
Choose a model location to keep your project organized
-
Click OK
Pro tip: I name my analyses like CustomerInterview_[CompanyName]_[Date]—it saves hours during later reviews.
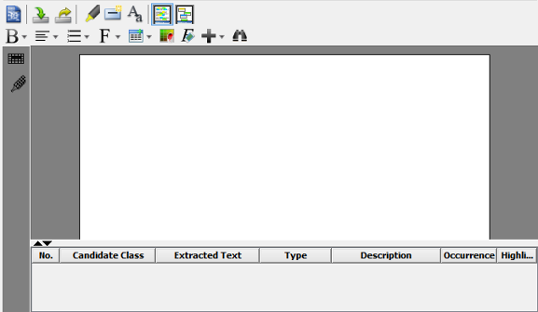
The Problem Statement Editor: Your Requirements Canvas
The editor is where the magic begins. It supports rich text formatting, tables, images, and even embedded model elements. Here’s the toolbar breakdown I reference daily:
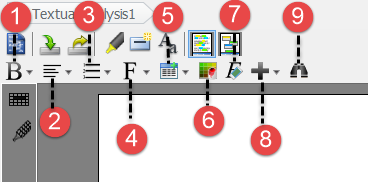
| No. | Feature | Why I Use It |
|---|---|---|
| 1 | Bold/Italic/Underline | Emphasize key pain points or stakeholder quotes |
| 2 | Text Alignment | Improve readability for shared documents |
| 3 | Ordered/Unordered Lists | Structure user stories or feature requests |
| 4 | Font Controls | Differentiate stakeholder voices (e.g., “Customer:” in blue) |
| 5 | Table | Map requirements to priorities or acceptance criteria |
| 6 | Background Color | Highlight unresolved questions in yellow |
| 7 | Clear Formats | Reset when importing messy external text |
| 8 | Link/Image/Model Element | Embed references directly in context |
| 9 | Find | Quickly locate terms across long transcripts |
Entering and Formatting Problem Statements
Visual Paradigm offers three flexible ways to get text into the editor:
Option 1: Type Directly
Ideal for live note-taking during interviews. I keep a template ready with sections like Stakeholder, Business Goal, Current Process, and Pain Points.
Option 2: Import a Text File
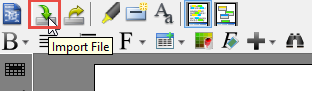
Perfect for transcribed meetings or exported chat logs. Click Import File on the toolbar, select your .txt file, and you’re ready to analyze.
Option 3: Copy and Paste
The fastest route for pulling content from emails, Slack, or Word docs. Just Ctrl+C / Ctrl+V.
Formatting for Clarity
Since the editor supports RTF, I use formatting strategically:
-
Highlight a key term like “Online Transaction Verification”
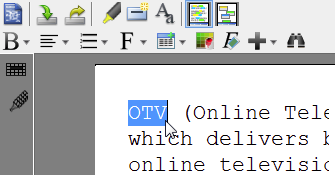
-
Apply formatting—like Italic—to mark it for glossary review
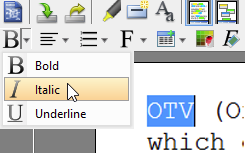
This visual tagging creates a natural workflow for the next phase: term extraction.
Discovering Project Keywords: Building Your Glossary
Words mean different things across domains. “Account” could mean a user profile, a bank account, or a Salesforce record. Textual Analysis helps you disambiguate by turning terms into glossary entries.
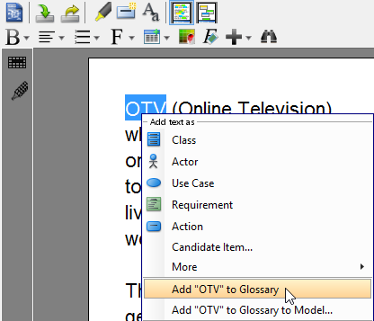
Step-by-Step: Adding a Term to Glossary
-
Highlight a specific term in the editor
-
Right-click → Add [term] to Glossary
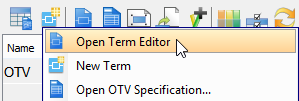
-
In the Glossary Grid, right-click the new term → Open Term Editor
-
In the Term Editor, define:
-
Aliases: Alternate names stakeholders use
-
Definition: Clear, project-specific meaning
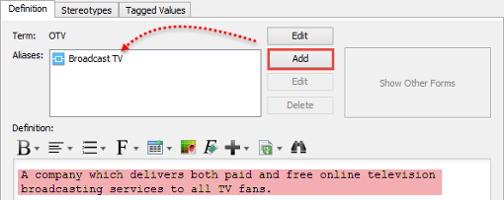
-
Result: A living project dictionary that prevents miscommunication.

💡 Pro Tip: Use the Transit From feature to jump back to the source text anytime—traceability built in.
Identifying Candidate Model Elements
Once your glossary is taking shape, the next step is extracting candidate objects—potential classes, use cases, or actors that could populate your UML diagrams.
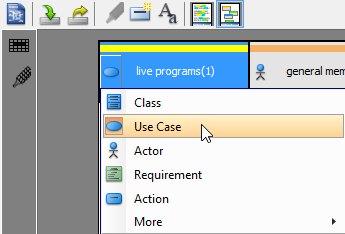
How to Identify Candidates
-
Highlight a phrase like “Premium Member” in your problem statement
-
Right-click → Add text as [model element type] (e.g., Class, Actor, Use Case)

Editing Candidate Properties
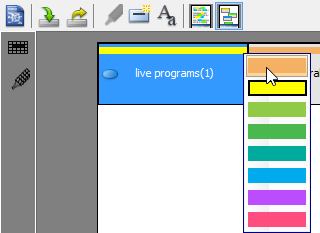
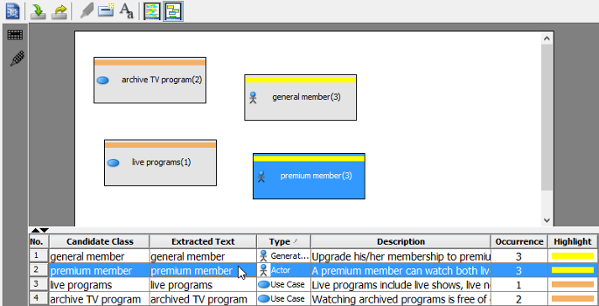
The grid at the bottom of the Textual Analysis view lets you refine candidates:
-
Rename: Double-click the Candidate Class cell

-
Change Type: Use the dropdown in the Type column
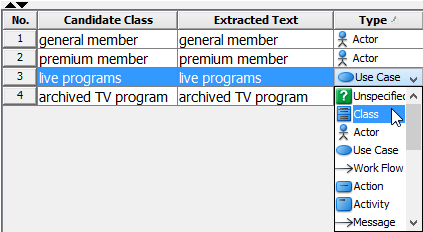
-
Add Description: Document behavior or constraints

-
Change Highlight Color: Visually group related candidates
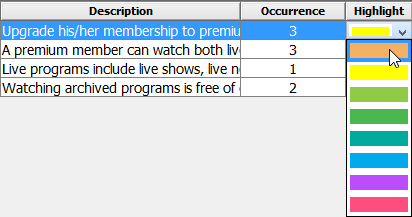
⚠️ Note: Descriptions entered here become the official documentation for the final model element—write them with care.
From Candidates to Diagrams: Visualizing Your Model
Candidate objects aren’t just lists—they’re the seeds of your system architecture. Here’s how I turn them into diagrams:
Creating Model Elements from Candidates
-
Right-click a candidate → Create [type] Model Element
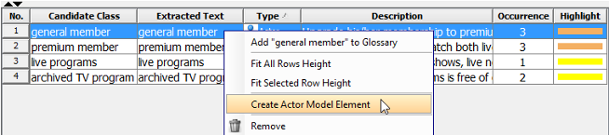
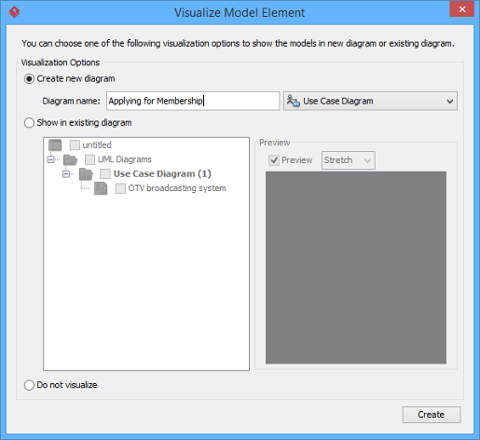
-
In the Visualize Model Element window:
-
Check Create new diagram for a fresh canvas, OR
-
Check Show in existing diagram to add to a working model
-
-
Click Show—your element appears instantly.
🔒 Note: Once a candidate becomes a real model element, the Create Model Element option disappears to prevent duplicates.
Drag-and-Drop from Model Explorer
For bulk visualization:
-
Open Model Explorer: View > Panes > Model Explorer
-
Select one or more candidates
-
Drag and drop onto your target diagram
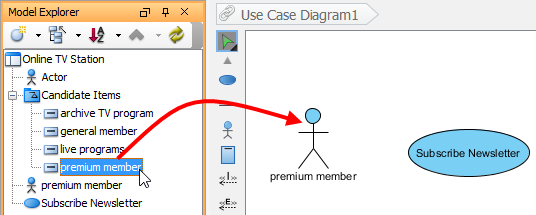
This is my go-to method when iterating on class diagrams during sprint planning.
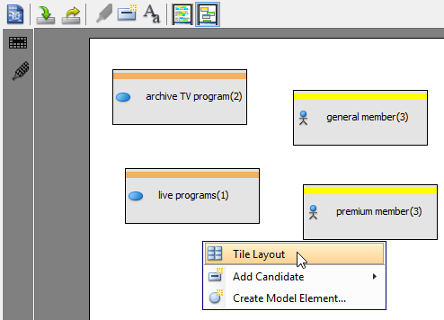
Mastering the Candidate Pane View
Textual Analysis offers two complementary views: the Problem Statement View (for text editing) and the Candidate Pane View (for visual organization).
Switching Views
Click the Candidate Pane View button to toggle:

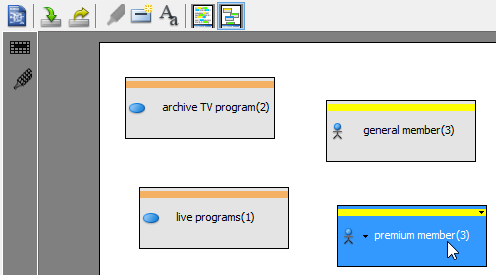
Candidate Pane Overview
Candidates appear as movable boxes—perfect for spatial thinkers.
Editing Directly on Boxes
-
Change Type: Hover over a box → click the icon dropdown → select new type
-
Change Highlight Color: Click the top-right dropdown on any box
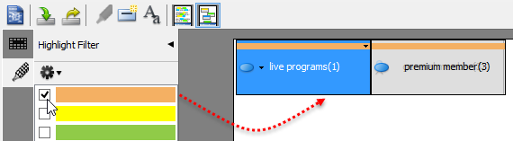
Filtering for Focus
-
Model Filter: Show only Classes, Use Cases, etc.
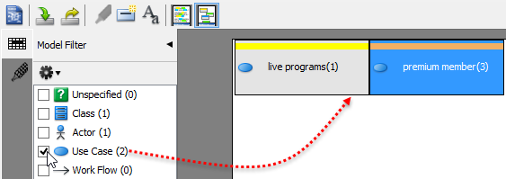
-
Highlight Filter: Focus on yellow-highlighted items (my “needs review” tag)
Spatial Organization
-
Drag boxes freely to group related concepts
-
Sync selection: Click a grid row → its box highlights (and vice versa)
-
Tile Layout: Right-click background → Tile Layout for automatic arrangement

Pro Tips and Lessons Learned
After using Textual Analysis across dozens of projects, here are my hard-won insights:
✅ Start small: Don’t try to model everything at once. Extract 3-5 key terms first, then expand.
✅ Color-code intentionally: I use yellow for “unclear,” green for “validated,” and blue for “technical debt.”
✅ Leverage aliases: Stakeholders use different words for the same concept. Capture them all in the glossary.
✅ Use descriptions as living documentation: The text you enter becomes part of your model’s official spec—write for future you.
✅ Iterate, don’t perfect: Your first candidate list will be messy. That’s okay. Refine as you learn more.
❌ Avoid over-highlighting: If everything is yellow, nothing stands out. Use highlights sparingly.
❌ Don’t skip the glossary: Skipping term definition leads to scope creep and misaligned teams.
Conclusion
Visual Paradigm’s Textual Analysis isn’t just a feature—it’s a philosophy. It acknowledges that requirements start as words, stories, and conversations, and provides a structured yet flexible path to transform that ambiguity into clarity.
By integrating note-taking, glossary building, candidate extraction, and diagram visualization into a single workflow, it eliminates the context-switching that plagues traditional requirements processes. For product managers, business analysts, and systems architects, this means less time wrestling with disconnected tools and more time delivering value.
My recommendation? Start your next discovery session with Textual Analysis. Capture the conversation, extract the insights, and watch your model emerge—naturally, traceably, and collaboratively. The bridge from text to model has never been shorter.
References
- Documenting Requirements with Textual Analysis Tool: Learn how to document customers’ needs by performing textual analysis in Visual Paradigm.
- Identifying important terms: Step-by-step guide to identifying glossary terms from a passage recorded by textual analysis.
- Identifying candidate objects: Instructions for identifying candidate model elements from a passage and converting them to actual model elements.
- Forming diagram from candidate objects: Tutorial on visualizing candidate elements in a diagram directly from textual analysis.
- Candidate pane view: Overview of the candidate pane view that displays candidate elements as visualized boxes for easy arrangement.
- Requirement Diagram & Textual Analysis Feature: Official feature page describing Visual Paradigm’s textual analysis capabilities for requirement documentation.
- Textual Analysis Tutorial: Interactive tutorial demonstrating how to extract project keywords and model elements from problem statements.
- Visual Paradigm Tutorials Library: Comprehensive collection of UML and modeling tutorials to help users get started with Visual Paradigm.
- Visual Paradigm YouTube Channel: Video tutorials, feature demos, and best practices from the Visual Paradigm team.
- Visual Paradigm Know-How: Community-driven knowledge base with tips, tricks, Q&A, and solutions to common user challenges.
- Visual Paradigm Support: Official support portal for contacting the Visual Paradigm team with questions, feedback, or technical assistance.
This post is also available in Deutsch, Español, فارسی, Français, English, Bahasa Indonesia, 日本語, Polski, Portuguese, Ру́сский, Việt Nam, 简体中文 and 繁體中文.