


Organizations thrive when their operational workflows are clear, efficient, and standardized. One of the most critical workflows in any service-oriented business is the customer onboarding journey. This process dictates the first impression a client has of your organization. To ensure consistency and identify bottlenecks, professionals rely on a visual language that bridges the gap between technical teams and business stakeholders. That language is Business Process Model and Notation, commonly known as BPMN.
This guide provides a comprehensive walkthrough of modeling a customer onboarding journey from start to finish using BPMN standards. We will explore the specific symbols, logic flows, and structural elements required to map this complex interaction accurately. By the end of this document, you will understand how to construct a robust process model that serves as a single source of truth for operations.
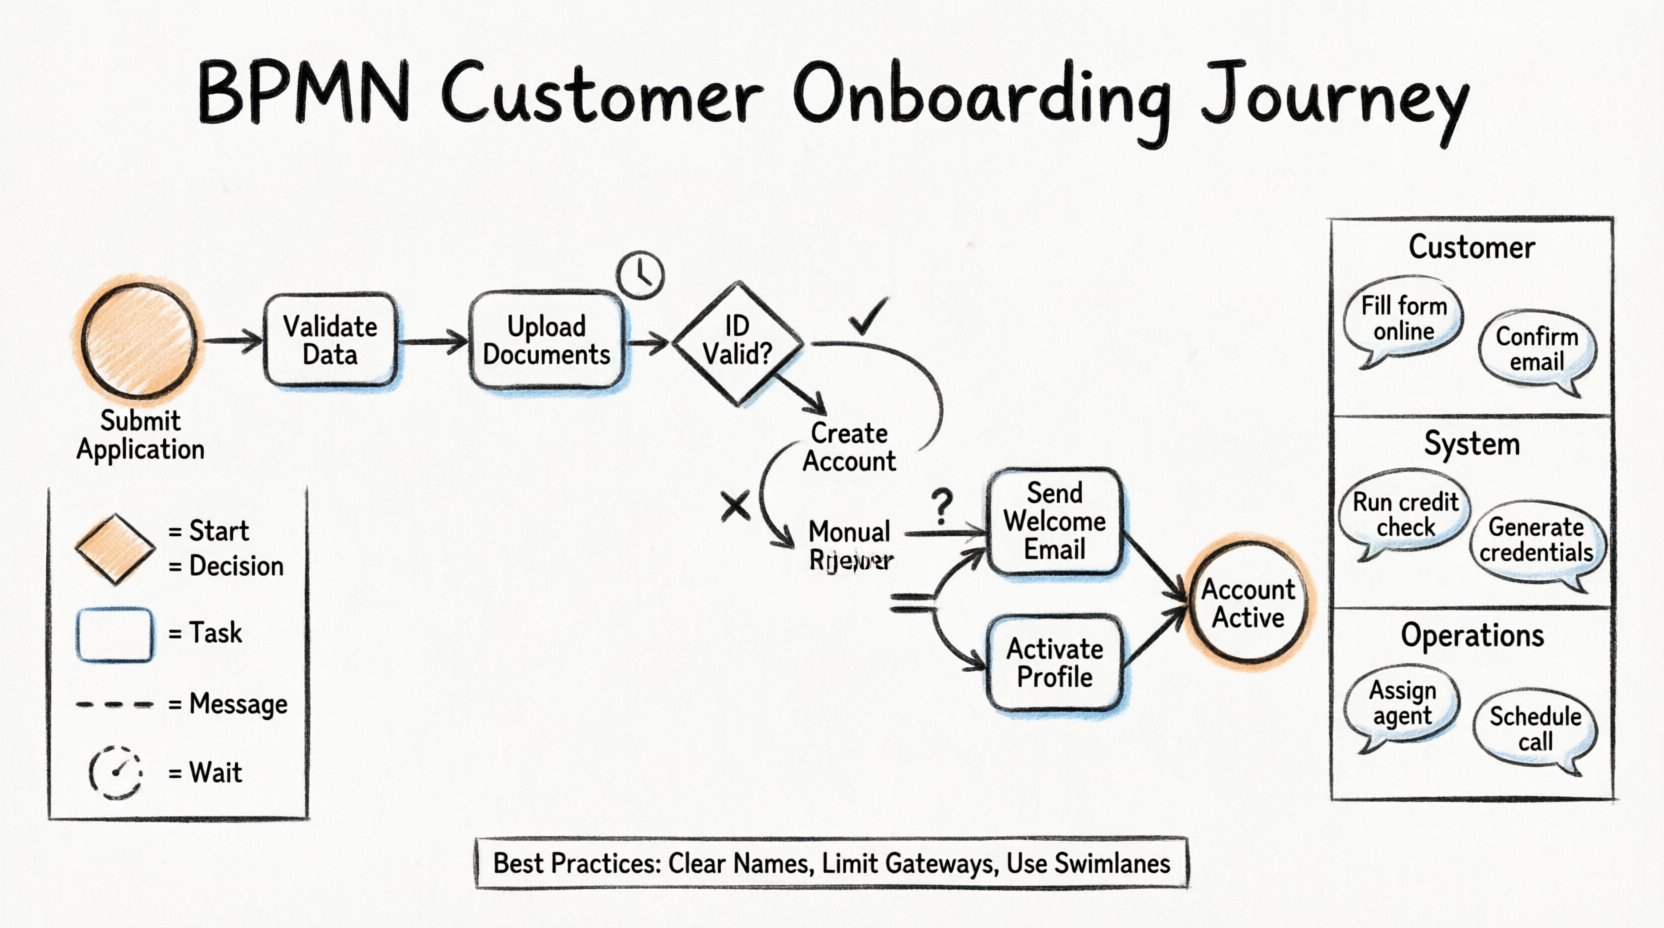
📐 Understanding BPMN Fundamentals
BPMN is a graphical notation for specifying business processes in a business process model. It is designed to be understood by both business analysts and technical developers without requiring a deep technical background. The standard allows for the representation of process logic, actors, and data flows in a standardized way.
When modeling a customer onboarding scenario, the goal is not just to draw boxes and arrows, but to capture the logic of decision-making, the timing of tasks, and the responsibilities of different departments. A well-constructed model allows stakeholders to simulate the process, identify delays, and measure performance metrics.
Key objectives for this modeling exercise include:
- Clarity: Ensuring every participant understands their role in the workflow.
- Compliance: Verifying that regulatory checks (like KYC or AML) are embedded in the flow.
- Efficiency: Identifying steps that can be automated or removed.
- Scalability: Creating a process that handles volume spikes without breaking.
🛠 Core Symbols in Customer Onboarding
Before diving into the specific journey, it is essential to review the building blocks used to construct the model. BPMN uses a specific set of shapes to denote different types of elements. In the context of onboarding, these elements represent actions taken by the customer, the system, or the support team.
Events
Events are things that happen during the course of a process. They are represented by circles. In an onboarding context, events trigger actions or mark their completion.
- Start Event: Marks the beginning of the onboarding journey, often triggered when a user submits an initial application form.
- Intermediate Event: Represents a pause or a wait. For example, waiting for a user to upload a document or waiting for a bank verification response.
- End Event: Marks the successful completion of the onboarding process or the termination of the request due to rejection.
Activities (Tasks)
Tasks are the actual work performed. In BPMN, these appear as rounded rectangles. They represent a unit of work that has a beginning and an end.
- User Task: Work performed by a human. Examples include the customer filling out a form or an agent reviewing an ID.
- Service Task: Work performed by an IT system. Examples include checking a database or sending an email notification.
- Manual Task: Work that requires no specific system or human to perform, often a physical action, though less common in digital onboarding.
Gateways
Gateways control the divergence and convergence of paths. They are diamond-shaped symbols that determine the flow of the process based on conditions.
- Exclusive Gateway (XOR): Only one path is taken. For example, if verification passes, go to Step A; if it fails, go to Step B.
- Inclusive Gateway (OR): One or more paths can be taken simultaneously based on conditions.
- Parallel Gateway (AND): All outgoing paths are taken simultaneously. This is useful for tasks that can happen at the same time, like sending a welcome email and creating a user profile.
Connectors
Connectors link the elements together.
- Sequence Flow: Indicates the order of tasks (solid line with an arrow).
- Message Flow: Indicates communication between different pools or participants (dashed line).
- Association: Links an artifact, such as a document or text, to a specific task.
📊 Reference Table: BPMN Symbols for Onboarding
The following table summarizes the symbols you will encounter most frequently when modeling the customer onboarding journey.
| Symbol Shape | Element Name | Onboarding Example |
|---|---|---|
| Circle (Thick) | Start Event | Customer clicks “Submit Application” |
| Circle (Double) | End Event | Account is active and welcome email sent |
| Rounded Rectangle | Task | Verify Identity Documents |
| Diamond | Gateway | Is the ID valid? |
| Circle with Icon | Intermediate Event | Timer: Wait 24 hours for response |
| Dashed Line | Message Flow | Request sent to Third-Party Provider |
| U-Shaped | Sub-Process | Background Check Procedure |
🗺 Defining the Process Scope
Before drawing the diagram, you must define the boundaries of the process. An onboarding journey is often too large to model in a single diagram if it includes every minor detail. It is better to define a main process and use sub-processes for complex segments.
Start Point: The process begins when the prospective customer initiates the registration on the digital platform.
End Point: The process ends when the customer has full access to the service and receives confirmation.
Exclusions: Marketing campaigns prior to application are excluded. Post-onboarding support tickets are excluded. This keeps the model focused on the acquisition phase.
🔄 Step-by-Step Process Modeling
Now, let us construct the flow of the customer onboarding journey. We will move logically from the initial trigger to the final state.
1. The Trigger and Initial Data Entry
The process starts with a Start Event. This is triggered by the submission of the initial application form. Immediately following this is a Service Task where the system validates the format of the data entered. This includes checking for valid email formats, password strength, and phone number structure.
Once the data is validated, the system creates a unique Application ID. This ID is associated with all subsequent tasks to ensure data integrity.
2. Document Collection and Submission
The next phase involves collecting necessary documentation. This is typically a User Task assigned to the customer. The customer must upload identification documents (e.g., Passport, Driver’s License) and proof of address.
A Timer Intermediate Event should be attached here. If the customer does not upload the documents within 48 hours, the process may move to a reminder sequence or pause the application to conserve resources.
3. Automated Verification
Once documents are uploaded, the flow moves to an automated verification service. This is a Service Task. The system interacts with external databases to verify the authenticity of the provided ID. This is a critical step for regulatory compliance.
This task often involves an Inclusive Gateway. The system checks multiple criteria. If the document is readable and the data matches the form, the process continues. If the document is blurry or data mismatches, the flow diverges to a manual review queue.
4. Decision Making and Approval
This is where logic becomes paramount. An Exclusive Gateway determines the next path based on the verification result.
- Path A (Approved): The system proceeds to account creation.
- Path B (Rejected): The system notifies the customer of the rejection reason and closes the process.
- Path C (Manual Review): The case is assigned to a compliance officer for human review.
If the process goes to Path C, a User Task is assigned to the compliance team. They have the ability to approve, reject, or request more information. If they request more information, the flow loops back to the customer task, creating a feedback loop.
5. Account Provisioning
Once approval is granted, the process enters the provisioning phase. This is often a Parallel Gateway. Two or more tasks can occur simultaneously to save time.
- Task 1: Create the user profile in the main database.
- Task 2: Generate security tokens or API keys.
- Task 3: Send the welcome email.
After these parallel tasks complete, the paths converge at a Parallel Join Gateway. This ensures that the customer does not receive the “Welcome” message until their account is actually provisioned.
6. Final Confirmation and Handoff
The final step involves a End Event. The customer receives a confirmation of account activation. Simultaneously, the process triggers a notification to the Customer Success team, marking the onboarding as complete and the handoff to retention as the next phase.
🏊 Swimlanes and Actors
To make the model readable, it is crucial to organize tasks into swimlanes. Swimlanes (or Pools/Partitions) group tasks by the actor responsible for them. In a standard onboarding model, you typically see three main lanes.
| Swimlane | Responsibility | Example Tasks |
|---|---|---|
| Customer | Initiates and provides data | Fill form, Upload ID, Click confirm |
| System / IT | Validation and Automation | Check format, Verify DB, Send email |
| Operations / Admin | Manual Review and Exception Handling | Review flagged ID, Approve manually |
Using swimlanes prevents ambiguity. If a task appears in the “System” lane, it should not require human intervention. If a task appears in the “Customer” lane, it should be an action they perform. This separation helps in assigning costs and SLAs to specific parts of the process.
⚠ Handling Exceptions and Errors
A robust process model accounts for what goes wrong. In customer onboarding, errors are common. Technical glitches, rejected documents, or missing information can stall the process.
Error Flows
BPMN allows for the definition of Error Events. If a service task fails (e.g., the external database is down), an error flow can catch this immediately. Instead of letting the process hang, the error flow can trigger a retry mechanism or notify the technical support team.
Compensation
In some scenarios, if a step is completed but later found to be invalid, the process may need to “undo” a previous step. This is known as compensation. For example, if a user account was created but the credit check failed later, the compensation activity would be to delete the account and notify the user.
Timeouts
Timeouts are critical for onboarding. If a customer takes too long to verify their phone number, the application should be archived. A Timer Intermediate Event placed on the sequence flow can monitor this duration. If the time expires, the flow moves to an “Archive Application” task.
📈 Best Practices for Clarity
Creating a model is one thing; making it maintainable is another. Follow these guidelines to ensure your BPMN diagrams remain useful over time.
- Keep Levels Separate: Do not put every single click in the application into one diagram. Use sub-processes to encapsulate complex logic. For instance, the “Identity Verification” step can be a collapsed sub-process containing its own detailed flow.
- Use Clear Naming: Avoid abbreviations. Use “Verify Identity” instead of “Verify ID”. This ensures non-technical stakeholders understand the model.
- Limit Gateways: Too many gateways make the diagram look like a maze. Try to consolidate decision points. If a gateway has more than three outgoing paths, consider breaking it down.
- Consistent Color Coding: While BPMN is standard, using consistent colors for swimlanes or specific event types (like errors) can speed up reading.
- Document Assumptions: Add text annotations to the diagram explaining any business rules that are not immediately obvious. For example, “Approvals require Manager level access.”
🔍 Review and Optimization
Once the model is drafted, it must be reviewed. This is not a one-time activity. Business processes evolve. New regulations are introduced, and technology changes.
Validation Steps
Conduct a walkthrough with the actual people who will perform the tasks. Ask them if the model matches their reality. Often, the documented process differs from the actual process. This gap is where inefficiencies hide.
Metrics and KPIs
Embed key performance indicators into the model. You can tag specific tasks to track how long they take. For example, the “Manual Review” task should have a target duration of 4 hours. If the model shows an average of 24 hours, the bottleneck is identified.
Version Control
Every change to the process should be versioned. When you modify the onboarding flow, ensure the old version is archived. This is vital for auditing. If a customer complains about a specific action taken on a date, you need to know which process version was active at that time.
🎯 The Value of Standardization
Adopting a standard notation like BPMN brings value beyond just drawing pictures. It creates a common vocabulary.
- Communication: Developers and business analysts speak the same language.
- Automation: A standardized model can often be directly converted into executable workflow code.
- Training: New hires can understand the workflow logic by reading the diagram before starting their role.
- Optimization: It is easier to optimize a visual representation than a written policy document.
By following this walkthrough, you establish a foundation for a process that is transparent, efficient, and scalable. The customer onboarding journey is the gateway to long-term retention. Modeling it correctly ensures that gateway remains open and welcoming.
This post is also available in Deutsch, Español, فارسی, Français, English, Bahasa Indonesia, 日本語, Polski, Portuguese, Ру́сский, Việt Nam, 简体中文 and 繁體中文.