Introduction
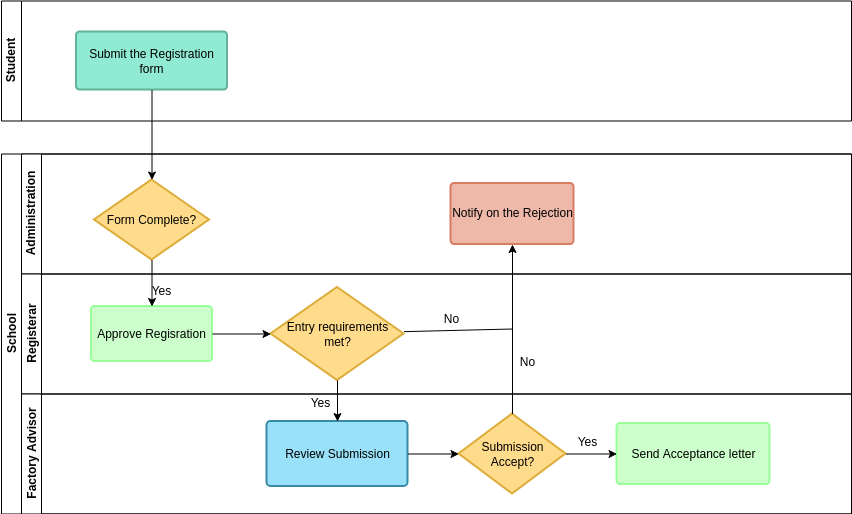
Swimlane activity diagrams are a type of UML (Unified Modeling Language) diagram used to model the workflow of a system, highlighting the responsibilities of different participants or components. These diagrams are particularly useful for visualizing complex processes and understanding how different parts of a system interact. This guide will explain what swimlane activity diagrams are, when to use them, and how to create them, using the attached example of a student registration process.
What is a Swimlane Activity Diagram?
A swimlane activity diagram is a visual representation of a process that shows the sequence of activities and the roles or components responsible for each activity. The diagram is divided into lanes, each representing a different participant or component, making it easy to see who does what and when.
When to Use Swimlane Activity Diagrams
Swimlane activity diagrams are useful in various scenarios, including:
- Complex Processes: When the process involves multiple participants or components, swimlane diagrams help in organizing and understanding the workflow.
- Role Clarification: When it is essential to clarify the responsibilities of different roles or components in a process.
- Process Improvement: When analyzing and improving processes, swimlane diagrams help identify bottlenecks and inefficiencies.
- Communication: When communicating the process to stakeholders, swimlane diagrams provide a clear and concise visual representation.
How to Create a Swimlane Activity Diagram
Creating a swimlane activity diagram involves several steps. Let’s break down the process using the The following example of a student registration process.

- Identify Participants:
- Student: The individual submitting the registration form.
- Administration: The department responsible for initial form verification.
- School Registrar: The office that approves the registration.
- Faculty Advisor: The advisor who reviews the submission and makes the final decision.
- Define Activities:
- Submit the Registration form: The student submits the registration form.
- Form Complete?: The administration checks if the form is complete.
- Notify on the Rejection: The administration notifies the student if the form is incomplete.
- Approve Registration: The school registrar approves the registration if the form is complete.
- Entry requirements met?: The school registrar checks if the entry requirements are met.
- Review Submission: The faculty advisor reviews the submission if the entry requirements are met.
- Submission Accept?: The faculty advisor decides whether to accept the submission.
- Send Acceptance letter: The faculty advisor sends an acceptance letter if the submission is accepted.
- Organize Activities into Swimlanes:
- Student Swimlane: Includes the activity “Submit the Registration form.”
- Administration Swimlane: Includes the activities “Form Complete?” and “Notify on the Rejection.”
- School Registrar Swimlane: Includes the activities “Approve Registration” and “Entry requirements met?”.
- Faculty Advisor Swimlane: Includes the activities “Review Submission,” “Submission Accept?”, and “Send Acceptance letter.”
- Connect Activities with Control Flow:
- Use arrows to connect the activities in the sequence they occur.
- Use decision nodes (diamonds) to represent points where the control flow branches based on a condition.
Step-by-Step Guide Using the Example
- Student Submits the Registration Form:
- The process starts with the student submitting the registration form.
- Administration Checks the Form:
- The administration receives the form and checks if it is complete.
- If the form is incomplete, the administration notifies the student, and the process ends.
- School Registrar Approves the Registration:
- If the form is complete, the school registrar approves the registration.
- The school registrar then checks if the entry requirements are met.
- If the entry requirements are not met, the process ends.
- Faculty Advisor Reviews the Submission:
- If the entry requirements are met, the faculty advisor reviews the submission.
- The faculty advisor decides whether to accept the submission.
- If the submission is accepted, the faculty advisor sends an acceptance letter, and the process ends.
Recommendation: Visual Paradigm for UML
Visual Paradigm is a powerful UML modeling tool that supports swimlane activity diagrams. It offers a user-friendly interface and a wide range of features to help you create and manage your diagrams efficiently. Some of its key features include:
- Drag-and-Drop Interface: Easily create and modify diagrams with a simple drag-and-drop interface.
- Collaboration Tools: Work with your team in real-time, sharing and collaborating on diagrams.
- Integration: Integrate with other tools and platforms for seamless workflow management.
- Templates and Examples: Access a library of templates and examples to get started quickly.
By using Visual Paradigm, you can effectively model and visualize complex processes, making it easier to understand and communicate your system’s workflow.
Conclusion
Swimlane activity diagrams are essential for modeling and understanding the workflow of a system, especially when multiple participants are involved. By using tools like Visual Paradigm, you can create detailed and accurate diagrams that help in analyzing and improving your processes. The attached example of a student registration process illustrates how swimlane activity diagrams can be used to clarify roles, organize activities, and visualize the sequence of events in a complex process.
