
Transform Your Product Backlog into a Strategic, Visual Roadmap
🔹 Introduction: Why User Story Mapping?
In agile development, a flat backlog of user stories often leads to misalignment, scope creep, and poor prioritization. Agile Story Mapping—popularized by Jeff Patton—solves this by turning the product backlog into a visual, user-centric journey map that reveals the big picture.
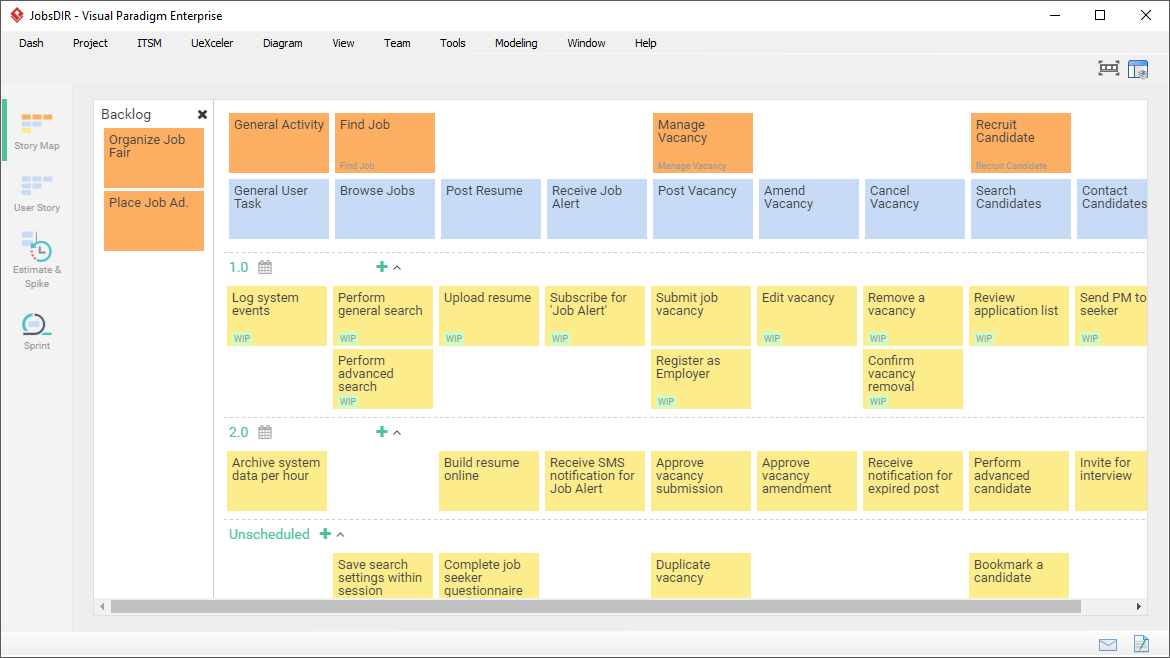
Visual Paradigm provides a powerful, intuitive User Story Map tool (available in both desktop) that helps Scrum teams, product owners, and stakeholders collaboratively plan, prioritize, and deliver value iteratively.
✅ This guide walks you through the core concepts, best practices, step-by-step creation, and advanced features of User Story Mapping in Visual Paradigm.
🔹 What Is User Story Mapping?
“A visual technique to organize user stories around the user’s journey, helping teams understand what to build, when to build it, and why it matters.”
🎯 Core Idea:
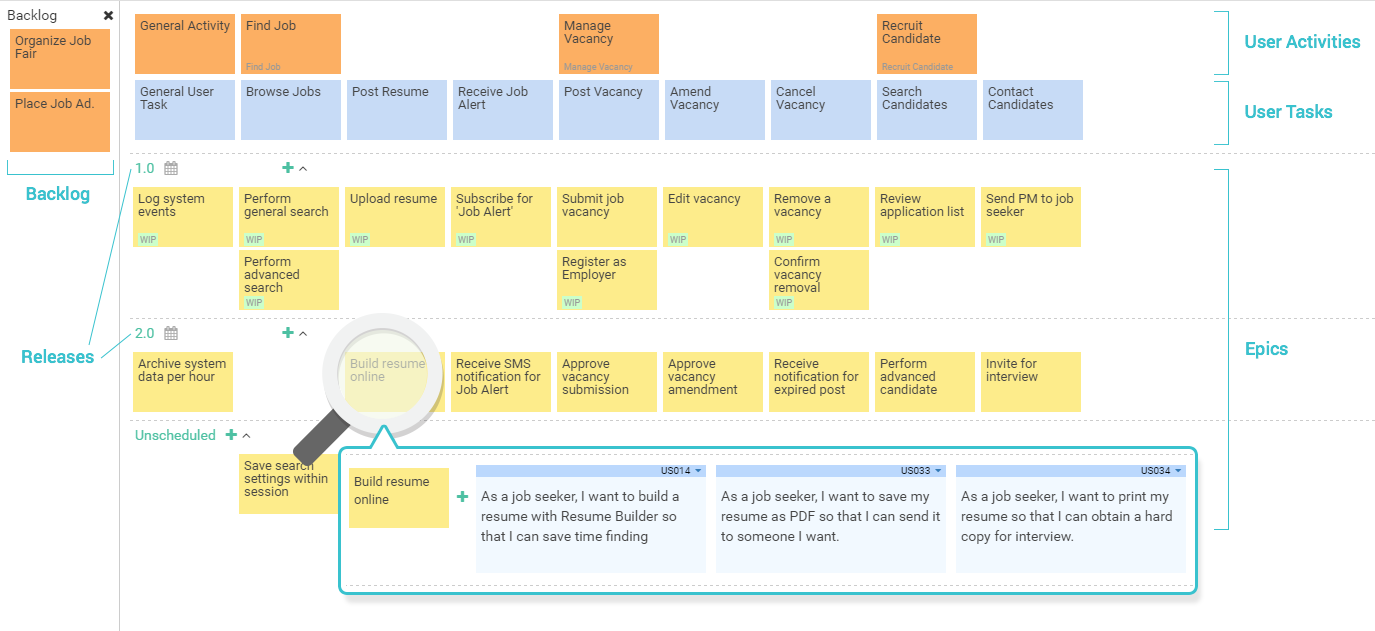
Instead of listing stories in a random order, story mapping arranges them in a 2D grid:
-
Horizontal Axis (X-axis): The user’s journey over time – from start to finish.
-
Vertical Axis (Y-axis): Level of detail – from high-level activities down to granular user stories.
This creates a “spine” (or backbone) of major user steps and vertical slices of functionality.
🔹 Key Benefits of User Story Mapping
| Benefit | Explanation |
|---|---|
| Visualizes the Big Picture | See how features fit into the user’s real-world workflow. |
| Improves Prioritization | Focus on delivering value early with MVPs and iterative releases. |
| Reveals Gaps & Omissions | Missing steps? Incomplete flows? Easily spotted. |
| Enhances Collaboration | Great for backlog grooming, sprint planning, and stakeholder alignment. |
| Supports Release Planning | Slice across the map to define what goes into each release. |
💡 It turns abstract backlogs into a living, breathing product roadmap.
🔹 How Visual Paradigm Implements Story Mapping
Visual Paradigm’s User Story Map is designed for agility, flexibility, and collaboration.
📌 Available Structures
| Structure | Use Case | Recommended For |
|---|---|---|
| 3-Level Structure Activities → Tasks → Stories |
Small to medium projects | ✅ Default & beginner-friendly |
| 4-Level Structure Activities → Tasks → Epics → Stories |
Medium to large/complex systems | 🛠️ For detailed, enterprise-grade apps |
⚠️ Note: Switching from 4-level to 3-level is irreversible if the map already contains content.
🔹 Core Elements of a Story Map
| Element | Description | Example |
|---|---|---|
| User Activity (Spine) | High-level goal or major step in the user journey. | “Browse Products”, “Checkout”, “Track Order” |
| User Task | A concrete action to achieve an activity. | “Search for products”, “Add item to cart” |
| Epic (Optional 4th Level) | A large body of work that groups related stories. | “Implement Search Functionality” |
| User Story | Small, testable, INVEST-compliant story. | As a customer, I want to filter products by price so I can find affordable items. |
✅ Best Practice: Use the 3C’s for writing effective user stories:
Card: The story written on a card (title + description).
Conversation: Discuss details with the team.
Confirmation: Define acceptance criteria (tests).
🔹 Step-by-Step Guide: Creating a Story Map in Visual Paradigm
✅ Prerequisites: Visual Paradigm Desktop or VP Online (https://online.visual-paradigm.com)
✅ Step 1: Start a New Project
-
Open Visual Paradigm (desktop or online).
-
Create a new Agile Project or open an existing one.
✅ Step 2: Create a User Story Map
-
Go to Diagram > New.
-
Select User Story Map under the Agile or UeXceler category.
-
Click Create.
📌 The map appears with a default 3-level structure (Activities → Tasks → Stories).
✅ Step 3: Configure the Structure (Optional)
-
Right-click the map → Configure Structure.
-
Choose between:
-
3-Level: Activities → Tasks → Stories
-
4-Level: Activities → Tasks → Epics → Stories
-
-
Click Apply.
🔄 You can change this anytime, but switching from 4-level to 3-level will merge Epics into Tasks.
✅ Step 4: Build the Backbone (User Journey)
-
Drag and drop User Activities from the palette onto the top row.
-
Arrange them left to right in the natural order of the user journey.
🔤 Example (E-commerce App):
Browse Products
Add to Cart
Checkout
Track Order
Leave Review
✅ Tip: Use drag-and-drop to reorder activities. The map auto-adjusts layout.
✅ Step 5: Break Down Activities into Tasks
-
Click the “+” icon under each activity to add User Tasks.
-
Add tasks that represent the steps the user takes to complete the activity.
Example: Under “Browse Products”
Search for products
Filter by category
Sort by price
View product details
🎯 Tip: Keep tasks actionable and atomic.
✅ Step 6: (Optional) Add Epics (4-Level Only)
-
If using 4-level structure, expand each Task and add Epics.
-
Use Epics to group large features.
Example: Under “Search for products”
Epic: Implement Search with Filters
Epic: Enable Autocomplete Suggestions
✅ Step 7: Add User Stories (Bottom Layer)
-
Under each Epic or Task, add User Stories.
-
Use the standard format:
As a [user], I want [feature] so that [benefit].
✅ Example:
As a shopper, I want to filter products by price range so I can find affordable items.
As a shopper, I want to sort products by rating so I can see popular choices.
📝 Pro Tip: Use inline editing (double-click) to quickly update story text.
✅ Step 8: Prioritize with Drag-and-Drop
-
Left-to-right = Time/Importance
(Most important steps on the left) -
Top-to-bottom = Detail & Priority
-
Higher-level items (Activities/Tasks) at the top
-
Most detailed stories at the bottom
-
✅ Drag stories, tasks, or activities to re-prioritize. The map automatically reorganizes.
🎯 Best Practice: Prioritize by value, not just effort. Ask: “Which step delivers the most value to the user?”
✅ Step 9: Define Release Slices (Horizontal Cuts)
-
Imagine slicing the map horizontally across the columns.
-
Each slice represents a release or iteration.
Example:
Release 1 (MVP): Browse Products + Add to Cart
Release 2: Checkout + Payment
Release 3: Track Order + Leave Review
🛠️ How to do it:
Use color-coding or tags to label each slice.
Use sticky notes or text annotations to define release scope.
📊 Visual Tip: Use different background colors per release to make it clear.
✅ Step 10: Enhance with Visual & Collaboration Features
| Feature | How to Use | Benefit |
|---|---|---|
| Drag & Drop | Reorder activities, tasks, stories | Fast, intuitive prioritization |
| Inline Editing | Double-click any card | Quick updates |
| Ad-hoc Add | Hover over a cell → “+” appears | Add stories on the fly |
| Automatic Layout | Auto-adjusts after edits | Clean, readable map |
| Color Coding / Tags | Assign colors to stories (e.g., high priority, blocked) | Visual status tracking |
| AI Assistance (v2024+) | Click “Generate Stories” → AI suggests stories based on tasks | Speeds up backlog creation |
| Import from Other Tools | Import from Use Case, BPMN, Mind Maps | Reuse existing models |
| Integration with Scrum Canvas | Link to Sprint Planning, Backlog Refinement | Full agile lifecycle support |
🔹 Best Practices & Guidelines
| Practice | Why It Matters |
|---|---|
| Start with the user journey | Focus on real user behavior, not technical features. |
| Keep activities high-level and user-focused | Avoid technical jargon. Use “As a user…” language. |
| Use 3-level structure for simplicity | Easier to manage; ideal for most teams. |
| Limit stories to 1 sprint | Ensure each story is small enough to be completed in a sprint. |
| Review and update regularly | The map evolves as the product grows. |
| Involve the whole team | Developers, QA, UX, POs — all perspectives matter. |
| Use the map in sprint planning & backlog grooming | It’s not just a planning tool — it’s a living document. |
🔹 Real-World Example: E-Commerce App
Let’s walk through a 3-level story map for an e-commerce app:
| Horizontal Axis (Journey) | Vertical Axis (Detail) |
|---|---|
| 1. Browse Products • Search • Filter • Sort • View details |
– As a shopper, I want to search products by name so I can find what I need. – As a shopper, I want to filter by category and price so I can narrow results. |
| 2. Add to Cart • Select size/quantity • Add item |
– As a shopper, I want to select product size and quantity before adding to cart. |
| 3. Checkout • Enter shipping info • Choose payment method • Confirm order |
– As a shopper, I want to enter my shipping address so I can receive my order. |
| 4. Track Order • View status • Get notifications |
– As a shopper, I want to track my order in real-time so I know when to expect delivery. |
| 5. Leave Review • Rate product • Write feedback |
– As a shopper, I want to rate and review a product so I help others make decisions. |
🎯 Release Planning:
MVP (Release 1): Browse Products + Add to Cart
Release 2: Checkout + Payment
Release 3: Track Order + Leave Review
🔹 Pro Tips & Advanced Features
-
✨ Use AI to Generate Stories: In newer versions, right-click a task → “Generate Stories” → AI suggests 5–10 relevant stories.
-
📥 Import from Use Cases: Reuse existing use case diagrams to jumpstart your story map.
-
📊 Export as PDF or Image: Share with stakeholders or include in sprint reviews.
-
🔄 Link to Backlog: Story Map can be linked to Scrum Board or Backlog in Visual Paradigm for seamless execution.
-
🧩 Use Templates: Save common story maps (e.g., login flow, onboarding) as templates for reuse.
🔹 Conclusion: Make Your Backlog Meaningful
User Story Mapping in Visual Paradigm transforms chaotic backlogs into strategic, visual roadmaps that:
-
Align teams around user value
-
Enable data-driven prioritization
-
Support iterative delivery
-
Foster transparency and collaboration
🏁 Final Thought:
A story map isn’t just a backlog—it’s a conversation starter, a planning tool, and a promise to deliver real user value.
✅ Start mapping today — turn your backlog into a masterpiece of user value.
✨ Your product journey begins with a single story, and ends with a map that guides the way.
- What Is Scrum? A Complete Guide to Agile Project Management: This in-depth overview explains the core principles, roles, and processes that define the Scrum framework in agile software development.
- Agile Methodology Tutorial: Principles and Practices Explained: A comprehensive tutorial detailing fundamental Agile principles, various frameworks, and their real-world applications in software development.
- Sprint Guide in the Agile Handbook: This resource provides a thorough overview of sprints, explaining their purpose, structure, and essential role in iterative software development.
- How to Start a Sprint Using the Scrum Process Canvas: This article offers step-by-step guidance on initiating a sprint using the Scrum Process Canvas, with an emphasis on planning and team alignment.
- Sprint Planning in Agile: Step-by-Step Guide: A detailed and actionable guide to effective sprint planning, covering backlog prioritization, task breakdown, and alignment within Agile environments.
- The Scrum Sprint Cycle in 8 Clear Steps: This article provides a detailed breakdown of the Scrum sprint cycle, illustrating how teams deliver value through iterative, time-boxed increments.
- Unleash the Power of Agile and Scrum with Visual Paradigm: A comprehensive guide demonstrating how specialized tools can enhance Agile and Scrum practices to improve project planning, collaboration, and delivery.
- What Is a User Story? A Complete Guide to Agile Requirements: This guide explains the concept of user stories and their critical role in capturing user needs within the product backlog for Scrum teams.
- Scrum Process Canvas – Agile Project Management Framework: This resource highlights a structured canvas designed for managing Agile projects, supporting activities like sprint planning, backlog refinement, and team alignment.
- Scrum vs Waterfall vs Agile vs Lean vs Kanban: This article provides a comparative analysis of the most commonly used methodologies, including Scrum, Kanban, and traditional Waterfall models.